Showing posts with label Accuquilt. Show all posts

Sunday, 8 June 2014

Another Birthday Quilt

This is the second quilt that I helped my Baby Girl make at the beginning of this week.  I can show you today as she give it to Donna yesterday as her birthday gift.
Once again she used the Accuquilt go to cut the blocks. She machine pieced and machine quilted on her Janome Memory Craft  5700.  
Happy Birthday Donna.

Wednesday, 4 June 2014

Birthday Quilt

My Baby Girl asked me to help her make two small quilts for birthday gifts for two of her dear friends.  She chose seven  fabrics for each quilt.  Using the Accuquilt Go she cut 6 1/2 inch squares.  The size of each piece of fabric dictated how many squares were cut.
She arranged them in a pleasing order and stitched them into rows using a quarter inch foot on her sewing machine.  As this was a quick project, she added no borders.  Straight line quilted a half inch from each seam using a walking foot.  
Mitred binding using a binding tool were added to finish the quilts.  
I can only show Stevie's quilt today as it was her birthday yesterday.  Happy Birthday Stevie.   

Tuesday, 27 May 2014

OPAM May 2014

I finished two pin cushions today.  I have lots of projects on the go at the moment but sadly I have only managed to finished the two pin cushions this month.
Note to oneself:  I must do better next month!! 
Plym Jar 2 x 20p = 40p  

Sunday, 20 April 2014

Lucy's Bag

I made this draw string bag last Monday as a Easter gift.  I gave the gift to Missie L today fill with Easter eggs and a chocolate bunny.  So I can now share with you how to make this delightful bag. As I did not photograph any stage whilst making Lucy's bag, I am going to make another bag tomorrow.  So this project will be posted over a few days.    

Lucy's Bag Part One
Recipe

Outer fabric
Cut five 5 inch squares - base and pockets
Cut four 5 x 8 inch rectangles - sides.

Lining fabric
Cut five 5 inch squares - base and pockets
Cut four 5 x 8 inch rectangle - sides

One metre of ribbon.

Saturday, 19 April 2014

Disappearing Four Patch

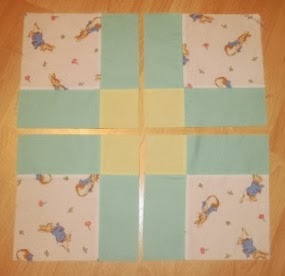
I first posted the instructions for the Disappearing Four Patch on the sister blog called Cupcake Quilter in March 2011. I am going to copy and paste the post here today.
Recipe

You will need the following to make one block:
A) One 5 x 5 inch blue plain/tone on tone.
B) One 5 x 5 inch red plain/tone on tone.
C) Two 5 x 5 inch white on white.

Sew together as above to form a four patch block. Press the seams open.
Cut 1 1/2 inches from the centre seam. With each cut turn the board not the fabric, this will help to keep the fabric from moving. Do not be tempted to move the pieces after each cut. Once you have cut four times then check to make sure you have cut properly.
Leave the four corners and centre blocks and turn the four outer middle blocks to form a new nine patch block.
Once you are happy with the new block sew the block back together. Pay extra attention to matching all the seams.
Next time you could vary the width of the cut from the centre seams. It will give a different feel to the block.
Well done.

Monday, 14 April 2014

April's Workshop

Another Monday afternoon workshop this week.  It was five weeks ago since three young students spent the afternoon here getting to know their sewing machines. 
Squares cut with accuquilt.
Blocks done for the table runner, now just need to arrange them into a pleasing design. 
A window makes a great and cheap light box. 
Remember to press and not iron!!
 Busy, busy, busy.
A late lunch on the lawn enjoying the sunshine.
 Banjo is wanting his photo taken with the girls.
 Two machine embroidery pieces, two hearts and one table runner.  Well done girls!!!

Friday, 11 April 2014

Easter Bags

I have made some Easter Bags, in fact I have made seven so far.  These small bags take a fat quarter of fabric to make, yes a whole fat quarter!!  
I forgot to show you my pin cushions that I have made for the craft fayre. Four round pin cushions plus a tiny round cushion and one large pin cushion.  
Plym Jar
7 x 20p = £1.40
5 x 20p = £1.00
1 x 10p = 10p
Total £2.50  

Wednesday, 9 April 2014

OPAM April 2014

I have busy making items to sell at the local craft fayre at Just Tracy this weekend.  It is a great way of using up my very large fabric stash.   
 
Nine Travel Tissue Covers.
Nine Japanese Flower Bags.
Eleven Box Cases.
Three Pen Cases.
Two Pen Cases and Two Flat Cases.
Eight Box Cases.
Five Flat Cases.
Plym Jar
40 x 20p = £8.00
9 x 10p = 90p
Total £8.90 

Tuesday, 1 April 2014

Quay Quilters

I have fun this afternoon teaching members of Quay Quilters how to made pin cushions.
At the show and tell time some members showed their blocks that they made at the daisy workshop I taught last week. 

Saturday, 29 March 2014

Craft Fayre

Craft Fayre season is about to begin again in the next few days.  I will be at Just Tracy's craft fayre on the 12th April 2014 10 am - 3 pm.
I have been making small items that are quickest to make as my shoulder injury is still on going.  I am only spending ten minutes at a time cutting, pinning or sewing to avoid causing my shoulder further injury or pain.  I am still sewing, laughing and breathing!
I hope to see you all at Just Tracy's craft fayre.
Plym Jar
7 x 20p = £1.40
6 x 10p = 60p
Total £2.00

Thursday, 6 March 2014

Goosey Quilters

I had a wonderful time with Goosey Quilters this evening.  They always give Mr D and myself a warm welcome.  The theme for this year is 'make do and mend'.
I cut lots of shapes on my 'Accuquilt Go' yesterday.  It takes only a few minutes to cut shapes for the whole group. 
As part of the theme is to use up our scraps and Goosey Quilt show is in September, I taught them how to make two types of pin cushions. These are great items for a sales table.  A simple round pin cushion that members could make in ten minutes or if they are new to sewing.  The second pin cushion takes a little longer and is larger than the round cushion.  Most members started the large pin cushion first.  They wanted to make and finish the cushion whilst I was at the meeting.
I also took my 'Accuquilt Go and Accuquilt Baby' so members could try cutting fabrics on the machines.  
Goosey Quilt Show in Tavistock on Thursday 11th - Saturday 13th September 2014. 

Plym Jar
9 x 20p = £1.80   

Monday, 3 March 2014

Workshop

Three young students spent the day here learning how to use their new sewing machines. They made cushions for gifts and a bag to keep their laptop safe travelling to university. 
I enjoyed teaching the next generation to care for their sewing machines and learn a new skill.  Thanks girls for a great day.

Thursday, 27 February 2014

Disappearing Nine Parch

I had a wonderful time this morning teaching my disappearing nine sampler to Plymstock Patchers.  They are a very talented group of quilters that made me very welcome.
Please insert a new needle into your sewing machine before you start this project.  I cut  5 inch squares.  Sew the squares into rows using a traditional 1/4 inch patchwork seam allowance.  Remember to shorten your stitch length.  Press the seams of each row in opposite direction.
Sew the rows together.  Remember to match the seams at the centre square.  Press the seams towards the centre.  Measure the centre square and divide by half.  For example, my centre square now measure 4 1/2 inches - half is 2 1/4 inches.
Cut down the centre of your nine patch both vertical and horizontal.  Trim if needed.
Now arrange/twist the new blocks into a pattern you like.  I never arrange my block with seams matching. I will update this post with a picture of my arranged/twisted blocks in the next few days.
The picture of my finished table runner is made of scraps squares left over from another project.  I will also post other blocks that are made using the disappearing nine patch, so please come back soon. 

Plym Jar
One Table Topper £1.00

Monday, 30 December 2013

Christmas Gifts

I teased you with clips of photos of Christmas gifts I made for my family last month.  I am pleased to say that the family loved their gifts.
  
The green table topper was made for my mother-in-law.  
The table topper with the blue border was a gift for my mother and the other for a special aunt.
I enjoyed designing and making these table toppers that I have added this new design to my workshop programme for 2014.